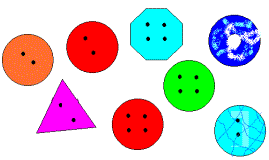
Eight buttons
How Many Buttons?
Begin With Buttons
In this unit, students use buttons to explore logical and numerical relationships. The unit begins with two lessons that focus on the two basic logical thinking skills, classification and seriation, which are the foundation for understanding numbers and number relationships. These abilities in turn form the basis for understanding addition and subtraction. In the next six lessons, students explore the relationships between numbers and model addition and subtraction sentences with buttons.
In this unit, students explore the operations of addition and all three meanings of subtraction (take away, comparative, and missing addend). A set model is used for both operations.
Individual Lessons
Lesson 1 - Button Trains In this lesson, students describe order by using vocabulary such as before, after, and between. They also review and use both cardinal and ordinal numbers. (SEE PAGE 2)
Lesson 2 - Many Sets of Buttons Students classify buttons and make disjoint and overlapping Venn diagrams. In an extension, they make and record linear patterns. (SEE PAGE 6)
Lesson 3 - How Many Buttons? In this lesson, students review classification, make sets of a given number, explore relationships between numbers, and find numbers that are one more and one less than a given number. They apply their knowledge of classification as they play a game similar to bingo. (SEE PAGE 9)
Lesson 4 - More and More Buttons Students use buttons to create, model, and record addition sentences. They also explore commutativity in addition contexts. (SEE PAGE 13)
Lesson 5 - Numbers Many Ways Students work with subtraction at the intuitive level as they explore number families and ways to decompose numbers to 10. They will also identify members of 'fact families.' [A fact family is a set of three (or two) numbers that can be related by addition and subtraction, for example: 7 = 4 + 3, 7 = 3 + 4, 7 - 4 = 3, and 7 - 3 = 4. When the number is a double, there are only two members of the fact family. An example would be 10 - 5 = 5, and 5 + 5 = 10.] (SEE PAGE 16)
Lesson 6 - Lost Buttons In this lesson and the following one, students investigate subtraction more directly, beginning with the easier “take away” mode. They model “take away” subtraction with buttons and write subtraction sentences. They also work with the additive identity (0) as an addend and as a difference and find missing addends. (SEE PAGE 19)
Lesson 7 - Shirts Full of Buttons Students explore subtraction in the comparative mode by answering questions of “How many more?” and “How many less?” as they match sets of buttons. They also make and discuss bar graphs based on the number of buttons they are wearing. (SEE PAGE 22)
Lesson 8 - Looking Back and Moving Forward This final lesson of the unit reviews the work of the previous lessons through a variety of activity stations, one of which involves using an interactive graphing tool. Students model with buttons and record addition and subtraction. (SEE PAGE 25)
We The Citizens of Palm Beach County Would Like To Know “How Many Buttons Does it Take To Pass Grade 3 FCAT?”
Lesson 1 - Button Trains In this lesson, students describe order by using vocabulary such as before, after, and between. They also review and use both cardinal and ordinal numbers.
Learning Objectives Students will: •identify positions using the terms before, after, and between
•name positions using ordinal numbers
•create a set that corresponds to a given number less than 10
•count the elements in a set of less than 10 members
Materials Buttons Crayons
Song Lyrics
“LONDON BRIDGE”
The Lyrics:
London Bridge is falling down, falling down, falling down.
London Bridge is falling down,
My fair lady.
How to Play:
The class stands in a single large circle. Two students standing next to each other are chosen at
random to be the first part of the bridge. They stand facing each other, hold hands, and lift their
arms up to make a bridge. The rest of the class walks in a line under the bridge as the song is sung.
On the words “my fair lady,” the students making the bridge bring their clasped hands down to
“capture” a student. The first student captured goes to the left side of the bridge and holds on to the
waist of the student forming that side of the bridge. The second student captured goes to the right
side of the bridge. The song is repeated until all students are in line on one side of the bridge or the
other.
“DOWN BY THE STATION”
The Lyrics:
Down by the station early in the morning
See the little puffer bellies all in a row.
See the station master turn the little handle
Puff, puff, toot, toot, off we go.
“IF YOU’RE HAPPY AND YOU KNOW IT” *
The Lyrics:
If you’re happy and you know it, clap your hands,
If you’re happy and you know it, clap your hands,
If you’re happy and you know it, take the time to show it,
If you’re happy and you know it, clap your hands,
* As there are many variations of the third line in this song, feel free to teach the one you are
familiar with.
Instructional Plan
Teach the students how to play the game London Bridge. After all the students have been “caught,” tell those in the left line to sit down and face the other line of students.
Ask the seated students such questions as:
Who is next to Marcia?
Who is in line just after Eric?
Who is in line just before Carol?
Who is between Tom and Karan?
Next ask the students who are standing to name their position in line using ordinal numbers (first, second, third, and so on). Then ask questions using these positions, such as: Who is in the sixth place in line?
Now have the students who are standing sit down and the students who are seated stand in line on the left side of the bridge. Pose similar questions about the students who are now standing.
[This lesson offers an opportunity for another song-related activity, this one focused on “Down by the Station.” Its words can be found here. If you wish, the students from each side of the bridge can become a separate train, naming their position in ordinal terms and moving around the room to the words of the song.]
Next distribute to each student a bag of buttons and a 10 Strip activity sheet. Display a numeral less than 10, and ask the students to make a button train by putting one button into that many spaces in the 10 strip, beginning with the far left space. [This space has been bordered in a heavy line to distinguish it as the first space on the train.] When they are ready, ask the students to count the filled spaces aloud.
Then call on various students to choose a number less than 10, and ask the other students to fill that many spaces in the 10 strip. Have students count the buttons aloud to check that they have used the correct number of buttons.
Now call on a student to display his or her train and ask the other students questions such as: What button is before the red one? What button is after the green one? Which button is in the second space? Which button is between the metal button and the striped one? Request the students to pose similar questions to their peers.
|
Eight buttons |
Next have them place one button in each of the 10 spaces. Then call on various students to describe their button strips using ordinal language. For example, a student might say, “I put a big blue button in the first space and a little red button in the second space. Then I put a button with two holes in the third space.” As a first entry in a unit portfolio, you may wish to have the students record one way that they filled the 10 strip.
Questions for Students
What number words did we use today that tell us how many we have of something?
What words did we use that tell about order?
Make a train with 10 buttons or less. How many buttons are in Judy's train? In Mark's?
Here is Sam's button train. Which button is in the third place? The 10th place?
Look at your train. Who has a red button in the fifth place?
What place comes after the sixth place in line? After the third place?
What place comes before the fourth place? Before the 10th place?
How many buttons will come before the sixth button in a train?
What place is between the second and fourth place?
Assessment Options
1.At this stage of the unit, it is important for students to know how to:
◦use the terms before, after, and between
◦name positions using ordinal numbers
◦create a set that corresponds to a given number up to 10
◦count the elements in a set of 10 or fewer members
Because these concepts, vocabulary words, and abilities are essential to other lessons in this unit, students who have not met these objectives should receive additional instruction before proceeding with Lessons 3–8
Teacher Reflection
Which position-describing words (before, after, between) were students familiar with when the lesson began?
Which cardinal numbers were they familiar with?
Were all students able to recognize the numerals up to 10? Were they able to make sets that corresponded to each numeral?
Were all students able to locate ordinal positions named in random order?
Which students met all the objectives of this lesson? What extension activities would be appropriate for those students?
Which students did not meet the objectives of this lesson?
What instructional experiences do they need next?
Would I make any adjustments the next time that I teach this lesson?
NCTM Standards and Expectations
Number & Operations Pre-K-2
Count with understanding and recognize "how many" in sets of objects.
Use multiple models to develop initial understandings of place value and the base-ten number system.
Develop understanding of the relative position and magnitude of whole numbers and of ordinal and cardinal numbers and their connections.
Develop a sense of whole numbers and represent and use them in flexible ways, including relating, composing, and decomposing numbers.
Use a variety of methods and tools to compute, including objects, mental computation, estimation, paper and pencil, and calculators.
Develop and use strategies for whole-number computations, with a focus on addition and subtraction.
Lesson 2 - Many Sets of Buttons Students classify buttons and make disjoint and overlapping Venn diagrams. In an extension, they make and record linear patterns.
Learning Objectives
Students will:
classify buttons according to given attributes
identify the attributes by which objects were sorted
Materials
Song Lyrics
Plastic bag containing 15 buttons for each student
Index cards
Yarn
Instructional Plan
Teach the students the song, "If You’re Happy and You Know It" using the available song lyrics.
Give each student a small plastic bag containing about fifteen buttons. Ask the students to dump their buttons onto their table or desk and tell them to find buttons in their set of buttons that fit each description that you will give.
First name an attribute such as “red.” Now lead the students in singing the song, substituting, “If you found a red button, hold it high” for “If you’re happy and you know it, clap your hands.” Sing several verses with other attributes, for example, big, square, broken, and four-holed-button.
Now hold up one button and ask the students to describe it in as many ways as they can. Record the descriptive words on the board.

Choose
two descriptive words that are mutually exclusive (such as blue and
white) and write them on separate index cards. Next form two circles
with yarn and put one index card face up in each yarn circle. Tell
the children the figure is called a Venn diagram. Now hold up a
button and ask where it should be put. [If the button is neither blue
nor white, place it outside the circles.] Repeat with several more
buttons, then remove both cards and all the buttons and repeat with
other attributes.
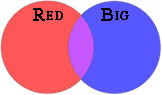
Next, on separate index cards, write words that might describe a single button (for example, big and red). This time, overlap the yarn circles and place one index card in each circle. Place a button in the correct position and elicit reasons why it goes in that place.Place a button in the correct position and elicit reasons why it belongs in that place. Now hold a button and ask where it should be placed in this new Venn diagram. Then call on volunteers to place other buttons on the diagram. [Buttons that have both attributes should be placed in the overlapping section.]
Next remove the buttons and the cards from the circles, and place two different index cards upside down, one in each yarn circle. Without revealing the sorting rule, place several buttons in the circles, then ask for volunteers to try to place additional buttons. If a student places a button incorrectly, move it to the proper position without explaining why.
When several buttons have been correctly placed, ask a volunteer to tell how he or she figured out what was written on the index cards. Then display the cards right side up so the students’ hypotheses can be verified. Repeat the activity with other attributes, using a different pair each time. To record the activity, ask each student to draw two overlapping circles, label them, and draw buttons in the circles.
Questions for Students
Can you find two buttons that are alike in some way? How are they alike? How are they different?
How did you know where to place a button when you could not see the labels?
Look at these buttons. What labels could you use to describe them?
Choose two ways to describe this button. If you made a Venn diagram with these attributes, would the circles overlap?
How would you tell another student how to place buttons?
Assessment Options
At this stage of the unit, it is important for students to know how to:
classify buttons according to given attributes
identify the attributes by which objects were sorted
Because identifying attributes and classification are the foundations for understanding number, the abilities to classify and identify are prerequisite to success in combining and removing sets. Therefore, students who are not able to demonstrate competency in both of them should receive additional instruction before continuing with the lessons in this unit.
Extensions
Display a Venn diagram into which buttons have been placed. Do not label the circles. Remove the buttons one at a time and create a linear pattern by repeating a pattern core (for example, green, and yellow) three times. [The pattern will be easier to detect if you use non-overlapping circles. To provide a special challenge, you may wish to use overlapping circles.]
Ask the students to watch as you remove the items from the Venn diagram and to discover the rule you are using to place them in a straight line. Ask for a volunteer to place the next button in the pattern. If the student placed a button correctly, say so and call for another volunteer to place the next button. If the button was placed incorrectly, ask the student to hold on to it and try again later.
After the students have placed several buttons, call on a volunteer to read the pattern aloud. Then help the students who placed their buttons incorrectly to add them to the pattern. Repeat with other patterns, using a different core pattern each time. [Appropriate cores include AB (shown in this example), ABB, ABC and AAB.]
Next ask the students to make a pattern with their buttons. [They may prefer to sort them first, although this is not necessary.] Call on a volunteer to read his or her pattern and ask whether anyone else has a pattern that is like that one in some way.
Encourage several students to read their button patterns. [You may wish to put the students into pairs and have each student make a pattern with three repeats, then try to add a repeat to his or her partner’s pattern.]

Teacher Reflection
Can most of the students recognize the attributes used in sorting? Which students still find this challenging?
Can most of the students sort independently? What activities are appropriate for those who cannot do this yet?
What activities are appropriate for those who can do this?
Which student pairs worked well together? Which student pairings need to be changed?
What parts of the lesson went smoothly? Which parts should be modified the next time that I teach this lesson?
NCTM Standards and Expectations
Number & Operations Pre-K-2
Use multiple models to develop initial understandings of place value and the base-ten number system.
Develop understanding of the relative position and magnitude of whole numbers and of ordinal and cardinal numbers and their connections.
Use a variety of methods and tools to compute, including objects, mental computation, estimation, paper and pencil, and calculators.
Develop a sense of whole numbers and represent and use them in flexible ways, including relating, composing, and decomposing numbers.
Count with understanding and recognize "how many" in sets of objects.
Develop and use strategies for whole-number computations, with a focus on addition and subtraction.
Lesson 3 - How Many Buttons? In this lesson, students review classification, make sets of a given number, explore relationships between numbers, and find numbers that are one more and one less than a given number. They apply their knowledge of classification as they play a game similar to bingo.
Learning Objectives
Students will:
identify objects that have a given attributes
create a set that corresponds to a given number less than 10
count the elements in a set of up to 10 members
write the number of elements in a set with up to 10 members
create sets of one more and one less than a given number to 10
Materials
Buttons
Crayons
Number cubes
Index cards
Button Bingo Grid Activity Sheet
Instructional Plan
Distribute bags of buttons to each student, and ask each to hold one button. Now read the story “The Lost Button” (From Frog and Toad Are Friends by Arnold Lobel, HarperCollins, 1970) to the students.
After the first desription of the lost button is given, ask the students whether the button they chose could be the lost button. If it is possible, have them stand. Ask the same question as you come to each attribute. If a description does not fit the button they are holding, they should sit down.
When the story is completed, have the students who are standing verify that their button has all the attributes. Have the rest of the class look through their set of buttons for those that have all the attributes.
(If you don’t have access to the story, here’s an alternative way to begin the lesson: Have the students each pick a button. Now choose several attributes that might describe a button and write them on different index cards. Pull one of the cards at random, read the attribute, and ask these students who have buttons with that attribute to stand. Then call out, one at a time, the other attributes listed on the index cards you choose, having students remain standing if their button continues to have all the attributes. When you have named several attributes, ask the students to locate all the buttons that meet all the chosen attributes.)
Next display a numeral less than 10 and ask the students to make a set with that many buttons. When they are ready, ask the students to trace the buttons in the set, count them aloud, and then write the number of buttons in the set under the tracing. Then call on a volunteer to choose another number less than 10 and ask the other students to make sets with that many buttons. Repeat several times. As each set is constructed, have students count the buttons in their set and record the appropriate numeral. You may wish to have the students place these recording sheets in their unit portfolios.

Eight
buttons
Next put the students into trios and distribute two number cubes to each trio. Show the students index cards on which you have written “=,” “One More, or One Less,” Review (or teach) the meaning of the phrases and of the equals symbol (in this case, the equals symbol shows that two sets have the same number of objects). Then give each student in the trio a different card.
Ask the student who received the card with the equals sign to roll one number cube, name the number showing, and make a set of that many buttons. Then have the other students make sets of one more or one less as their cards direct. When they have done so, call on various groups to describe what they did. Have the students switch cards within their trio and repeat this activity several times.
To end the lesson, have students return to their seats. Then ask them to describe their buttons in as many ways as they can. Write each attribute they call out so that the entire class can see it. Then pass out the Button Bingo Grids and ask the students to write one attribute at the top of each column on their grid. [The attributes “white,” “big,” “2 holes,” “black,” and “metal” are entered on this sample card. You may wish to have students replace them with attributes relevant to the buttons in your room.]
To start, you will be the caller. When the students are ready, hold up a button and ask them to find one button from their set of buttons that matches your button in at least one way. Have them place that button in an appropriate column on their Button Bingo grid. The first student to fill a column wins the round and becomes the caller for the next round. If more than one child finishes a column at the same time, have them roll two number cubes to determine who the next caller will be. [You might designate the child with the highest number or the one with the lowest number as the winner of the roll.]
Questions for Students
How many of your buttons are blue? How many are big? How many have four holes?
What number words did we use that help us describe how many we have of something?
What words did we use that help us tell about the order of objects?
Make a set with nine buttons or less. How many buttons would be in a set with one more? With one less? (Repeat with other numbers.)
Here is a set of buttons. Write how many are in the set. Then write how many will be in a set with one more. Then with one less.
What number comes after 6? After 9? Write those numbers.
What number comes before 4? Before 7? Write those numbers.
What number comes before 1? After 1? Write those numbers.
How many buttons will there be in a set of one less than six buttons?
Assessment Options
At this stage of the unit, it is important for students to know how to:
identify objects based on given attributes
create a set that corresponds to a given number less than 10
count the elements in a set up to 10 members
write the number of elements in a set with up to 10 members
create sets of one more and one less than a given number to 10
Students who have not met these objectives should receive additional instruction before proceeding with Lesson 4–8, because understanding of addition and subtraction is dependent upon mastery of rational counting.
Teacher Reflection
Were all students able to identify buttons when given a specific attribute?
Which cardinal (counting) number words were students familiar with when the lesson began?
Were all students able to recognize the numerals to 10? If not, which numerals caused them trouble?
Were they able to make sets that corresponded to each numeral?
Could they write all the numerals to 10? If not, which were they not able to write?
Were all the students able to make sets of one more and one less for each numeral to 10?
Which students met all the objectives of this lesson? What extension activities would be appropriate for those students?
Which students did not meet the objectives of this lesson? What instructional experiences do they need next?
Would I make any adjustments the next time that I teach this lesson?
NCTM Standards and Expectations
Number & Operations Pre-K-2
Count with understanding and recognize "how many" in sets of objects.
Use multiple models to develop initial understandings of place value and the base-ten number system.
Develop understanding of the relative position and magnitude of whole numbers and of ordinal and cardinal numbers and their connections.
Develop a sense of whole numbers and represent and use them in flexible ways, including relating, composing, and decomposing numbers.
Use a variety of methods and tools to compute, including objects, mental computation, estimation, paper and pencil, and calculators.
Develop and use strategies for whole-number computations, with a focus on addition and subtraction.
References
Lobel, Arnold. “The Lost Button.” In Frog and Toad Are Friends. New York: HarperCollins, 1970. (pp. 28 - 39.)
This lesson prepared by Grace M. Burton.
Lesson 4 - More and More Buttons Students use buttons to create, model, and record addition sentences. They also explore commutativity in addition contexts.
Learning Objectives
Students will:
model the addition of set
use the terms “addend” and “sum”
create addition sentences
explore the commutativity of addition
identify addends and sums on an addition chart
Materials
Buttons
Number cubes
Scrap paper
Strips of paper
Red, blue, and purple crayons or markers
Instructional Plan
To review rational counting and to prepare for the exploration of addition, distribute a bag of buttons and one number cube to each student. Ask the students to roll their number cube and then make a set with as many buttons as the number of spots showing on the number cube. Ask for volunteers to say the number in their set of buttons and then write it. Now tell the students to make a set of one more and one less button than the set they first made.
Group the students into pairs and give each pair two number cubes, a bag of buttons, and a strip of paper. Ask them to fold the strip in half, and then color one side of the paper red and the other side blue.
![]()
Display a class chart that is labeled “Number of Buttons on the Red Side,” “Number of Buttons on the Blue Side,” and “Number of Buttons in All.” Now ask the students to each roll a number cube and make a set containing the same number of buttons as there are spots showing on the number cube, with one student placing his or her set of buttons on the red side of the chart and the other student placing his or her set on the blue side. Then ask them to determine how many buttons they have when they join the two sets together.
To make the joining action more obvious, assign one student in each pair to place his or her hands around the two sets and say “whoosh” while bringing both sets of buttons together. On scrap paper, the other student writes in red the number of buttons on the red side, in blue the number of buttons on the blue side, and in purple the number of buttons in all. Then have the students switch roles. Repeat several times.
When they have identified several sums, help each group to enter two or three of their findings on a class chart. After the students have made their entries, ask them to give examples of the terms “addend” and “sum.” Call on a volunteer to read one row of the chart. Then call on other volunteers to read other rows. Next demonstrate how to write the entries on the chart as addition sentences. Encourage the students to record a few of their “whooshes” as addition sentences.
3 + 4 = 7
Now ask the students to put three buttons on the red side of their paper and four buttons on the blue side. Ask them to whoosh them together and record the addition sentence that tells what they did, using red and blue numerals for the addends and purple for the sum. Next, ask them to put four buttons on the red side and three buttons on the blue side and to predict how large the set will be when they whoosh the two sides together. Ask them to use red, blue, and purple numerals to write the addition sentences.
3 + 4 = 7 4 + 3 = 7
Repeat with other number pairs until the students are comfortable with the idea that order does not matter when they are joining two sets and recording the results.
Ask the students to choose one of the rows from the chart and draw a picture illustrating that number fact, writing under it the addition sentence that the picture illustrates. Then distribute a copy of the Sums to 10 chart to each student and ask the students to find the addends they just used, putting one finger on each addend. Demonstrate how they can bring their fingers together on the sum. [Note that the addends and sum are color coded to match the chart they worked with earlier.] Now ask them to find the same addends in the other color and see if they get the same sum. Now have several children use their drawings and the Sums to 10 chart to explain the commutativity property in their own words. You may wish to display the drawings in the classroom or in a more public place before adding the records to their portfolio.
Questions for Students
How can you show you are joining two sets?
How many buttons are on the red side of this sheet? On the blue side? How many in all?
Which sum on the classroom chart was listed first? What addends were used to get it?
Which sum on the Sums to 10 chart was the greatest? Which pairs of addends were used to get it?
Which pairs of addends on the Sums to 10 chart were used to get 8? 5?
Look at this row. Does any other row have the same sum? Are the addends the same?
Would you get the same sum if you had two buttons on the blue side and five on the red side as you would if five were on the blue side and two were on the red side? Can you show why?
Assessment Options
At this stage of the unit, it is important for students to know how to:
model addition using the set model
identify sums and addends
record addition sentences
recognize and use the order principle
identify addends and sums on an addition chart
Because young children often have difficulty putting their understandings into words, encourage them to demonstrate what they are thinking with objects and pictures first. The guiding questions listed above may assist you in understanding your students' level of knowledge, but others may suggest themselves as you talk with your students.
Teacher Reflection
Were all students able to model the addition of sets?
Could they record the addition in a number sentence?
Could they find addends and sums on an addition chart?
Did they use the terms “addend” and ‘sum” correctly?
Are all students able to explain in their own words the commutative property of addition?
Did some students exhibit special strengths? Did some students exhibit reluctance to participate? Why?
Which students met all the objectives of this lesson? What extension activities are appropriate for these students?
Which students did not meet the objectives of this lesson? What misconceptions did they demonstrate?
What parts of the lesson went smoothly? Which parts would I change the next time that I teach this lesson?
NCTM Standards and Expectations
Number & Operations Pre-K-2
Develop understanding of the relative position and magnitude of whole numbers and of ordinal and cardinal numbers and their connections.
Develop a sense of whole numbers and represent and use them in flexible ways, including relating, composing, and decomposing numbers.
Understand the effects of adding and subtracting whole numbers.
Count with understanding and recognize "how many" in sets of objects.
Connect number words and numerals to the quantities they represent, using various physical models and representations.
Use multiple models to develop initial understandings of place value and the base-ten number system.
Use a variety of methods and tools to compute, including objects, mental computation, estimation, paper and pencil, and calculators.
References
The idea of “whooshing” was shared by Janet Sharp of the University of Iowa during a summer institute in El Paso, Texas.
This lesson prepared by Grace M. Burton.
Lesson 5 - Numbers Many Ways Students work with subtraction at the intuitive level as they explore number families and ways to decompose numbers to 10. They will also identify members of 'fact families.' [A fact family is a set of three (or two) numbers that can be related by addition and subtraction, for example: 7 = 4 + 3, 7 = 3 + 4, 7 - 4 = 3, and 7 - 3 = 4. When the number is a double, there are only two members of the fact family. An example would be 10 - 5 = 5, and 5 + 5 = 10.]
Students will:
represent numbers in flexible ways
connect numerals to the quantities they represent
identify the addition and subtraction sentences related to a specific sum and pair of addends
Materials
Buttons
Number cubes
Crayons
Strips of paper
Sheets of paper
Instructional Plan
Provide pairs of students with two number cubes, buttons, and the red and blue strip of paper from the previous lesson. If these strips are not available, give the students a strip of paper and ask them to color one half of the paper red and the other half blue. Next ask them to count out seven buttons and write that number in purple on a separate sheet of paper. Then ask them to find as many ways as they can to separate the seven buttons into two sets, putting some (or no) buttons on the red side of the paper and some (or no) on the blue side. Ask them to record each way using red and blue numerals to match what they have done. Some of the possible sorts are shown below. There will be five more sorts when the set is complete.
![]()
7
3 4
5
2
0
7
When they have decomposed seven in several ways, help them enter two or three of their findings on a class record chart. Once all their sorts made have been recorded, ask the students whether there are any sorts missing. [There are eight possible sorts of seven objects. Students may need to be reminded to use 0 on each of the sides.]
Call on a volunteer to read one row of the chart. Now demonstrate how to rewrite that entry on the chart as a pair of addition sentences. Then challenge the students to write the same row as a pair of subtraction sentences. [You may wish to model how this is done if the students have not previously encountered the subtraction sign.]
Call on volunteers to read their subtraction sentences aloud. Then write the sum (7) and the four sentences that can be derived from a pair of its addends (say, 5 and 2.) [It will help the students to see the relationships regardless of whether they continue the convention of writing the addends in blue and red and the sum in purple.] Tell the students that this is called a fact family.
The fact family for 7, 5 and 2 is:
5 + 2 = 7
2 + 5 = 7
7 – 5 = 2
7 – 2 = 5
Now ask the students to count out eight buttons on the red side of their strip and repeat the activity, recording all the possible two-addend combinations for eight. [This time there will be nine ways to sort the buttons. You may wish to encourage them to look for a pattern as they make the sets.]
Repeat with other numbers. [The number of ways to sort the buttons will be one more than the number of buttons used. To be sure all the sorts are found, the students might be encouraged to start with all the buttons on one side of the strip, then move them one at a time to the other side of the strip, recording each addend pair as it is displayed.]
Finally, ask the students to choose a number from zero to 10 and write one fact family that has that sum. When the students are ready, ask several volunteers to demonstrate the fact family using buttons and a red and blue strip of paper. Then ask them to find the addends and sum for that fact family on their Sums to 10 chart.
You may wish to ask the students to select two addends and their sum to record for their portfolio by drawing a picture illustrating that fact family.
Assessment Options
At this stage of the unit, it is important for students to know how to:
represent numbers in flexible ways
connect numerals to the quantities they represent
identify the addition and subtraction sentences related to a specific sum and pair of addends
To assess students’ attainment of these abilities, give them chances to display their understanding using objects, words, and pictures.
Teacher Reflection
Were all students able to find pairs of addends for a given sum?
Could they write the numeral for a given set to 10? Which caused difficulty?
Could they use the sum and the addend pair in an addition sentence?
Are all students able to explain in their own words what a fact family is?
Can they demonstrate a fact family using buttons?
Which students were able to use the addend pair to create two subtraction sentences?
Did some students exhibit reluctance to participate? Why?
Which students met all the objectives of this lesson? What extension activities are appropriate for these students?
Which students did not meet the objectives of this lesson? What misconceptions did they demonstrate?
What parts of the lesson went smoothly? Which parts would I change the next time that I teach this lesson?
NCTM Standards and Expectations
Number & Operations Pre-K-2
Develop understanding of the relative position and magnitude of whole numbers and of ordinal and cardinal numbers and their connections.
Use multiple models to develop initial understandings of place value and the base-ten number system.
Develop a sense of whole numbers and represent and use them in flexible ways, including relating, composing, and decomposing numbers.
Count with understanding and recognize "how many" in sets of objects.
Understand various meanings of addition and subtraction of whole numbers and the relationship between the two operations.
Understand the effects of adding and subtracting whole numbers.
Develop and use strategies for whole-number computations, with a focus on addition and subtraction.
Develop fluency with basic number combinations for addition and subtraction.
Use a variety of methods and tools to compute, including objects, mental computation, estimation, paper and pencil, and calculators.
This lesson prepared by Grace M. Burton.
Lesson – 6 In this lesson and the following one, students investigate subtraction more directly, beginning with the easier “take away” mode. They model “take away” subtraction with buttons and write subtraction sentences. They also work with the additive identity (0) as an addend and as a difference and find missing addends.
Learning Objectives
Students will:
determine the results of removing sets
review the term “difference”
investigate subtracting zero and subtracting all
find a missing addend
Materials
Number cubes
Buttons
Crayons
Instructional Plan
Call seven students to the front of the room and roll a number cube to decide how many will return to their seats. Have a volunteer record on the board the subtraction equation the students acted out. Repeat with different sets of seven students. Then ask zero students to sit down and call on a volunteer to record the sentence 7 – 0 = 7. Finally, ask all seven students to sit down and ask a volunteer to record the number sentence 7 – 7 = 0 where all can see it. Have the students identify the difference in each number sentence.
Ask the students whether they have ever lost a button. [At this point you may wish to read Corduroy by Don Freeman. In this story, a stuffed bear lost a button.] Now group the students in pairs and give each pair a bag of buttons, two number cubes, and a copy of one of the Shirts Template. Tell them to put six to 10 buttons on the shirt, and then take some buttons away as if the buttons had been lost. Ask them to make a record of how many they started with, how many they “lost” and how many were left.
Call attention to a chart with columns you have labeled “Number of Buttons,” “Number Lost,” and “Number Left.” Display a shirt with six buttons and roll a number cube to see how many buttons to take away, for example, two buttons. Then demonstrate how to enter this information in the chart. For example, 6 (written in purple), 2 (written in red), and 4 (written in blue).
Next ask the students to create new entries for the chart and to record them under their picture of the shirt using the colors modeled on the chart. When they are ready, help them enter their findings on the class chart. Then ask them what would be recorded if they started with 7 buttons and took 7 away. Repeat with a model for 7 – 0. Prompt them to add entries to the chart. Now call on a volunteer to write each row of the chart as a subtraction sentence.
To help the students become more familiar with the “take away” model for subtraction, ask them to choose a row of the chart and make up stories about lost buttons using the numbers in that row. [Some children may need to use manipulatives to complete this task.] Then demonstrate how to use the Sums to 10 chart to find the answer when they know the sum and one addend. [Find the red addend. Go across the row until you get to the sum. Then go up the column to find the other addend.]
At the end of the lesson, ask children to choose one of the number sentences derived from the chart. They should draw a shirt with buttons on it and cross some out to illustrate one subtraction fact. Remind the students to write the number sentence under the picture. The drawings would make an appropriate entry for their mathematics portfolio.
Questions for Students
What happens when we take away four buttons from seven buttons? Can you show that with these buttons?
Which difference on our chart was the greatest? If we use only 10 buttons, do you think we could get a larger difference? How?
What would be the smallest difference we could get with eight buttons? How would you get it?
Suppose you had five buttons. What would the difference be if you lost two buttons? If you lost zero buttons? How about if you lost five buttons?
Look at the chart we made. How did someone get a difference of five? Did anyone get a difference of five another way?
Can you draw a picture to show that you had seven buttons and lost three of them?
If you know there are seven buttons on a shirt and you can only see three of them, how many can’t you see?
Show me how to use the Sums to 10 chart to find the addend that’s missing when the sum is six and one addend is two.
Assessment Options
At this stage of the unit, it is important for students to know how to:
model “take away” subtraction using the set model
identify differences and addends
recognize the effect of subtracting all and subtracting zero
find a missing addend
Teacher Reflection
Which pairs of students worked effectively together? Which pairs should be reconfigured?
Which students did not meet the objectives of this lesson? What caused them particular difficulty?
Can most of the students justify the difference when one addend is zero? Can they justify a difference of zero?
Can most of the children use the addition chart efficiently?
Which children met all the objectives of this lesson? What are appropriate next steps for them?
What parts of the lesson went smoothly? Which parts should I change the next time that I teach this lesson?
NCTM Standards and Expectations
Number & Operations Pre-K-2
Develop a sense of whole numbers and represent and use them in flexible ways, including relating, composing, and decomposing numbers.
Develop understanding of the relative position and magnitude of whole numbers and of ordinal and cardinal numbers and their connections.
Count with understanding and recognize "how many" in sets of objects.
Use multiple models to develop initial understandings of place value and the base-ten number system.
Understand the effects of adding and subtracting whole numbers.
Understand various meanings of addition and subtraction of whole numbers and the relationship between the two operations.
Develop and use strategies for whole-number computations, with a focus on addition and subtraction.
Use a variety of methods and tools to compute, including objects, mental computation, estimation, paper and pencil, and calculators.
Develop fluency with basic number combinations for addition and subtraction.
References
Freeman, Don. Corduroy. New York: Puffin Books, 1968.
This lesson prepared by Grace M. Burton.
Lesson 7 Students explore subtraction in the comparative mode by answering questions of “How many more?” and “How many less?” as they match sets of buttons. They also make and discuss bar graphs based on the number of buttons they are wearing.
Learning Objectives
Students will:
explore the results of comparing sets
review the term “difference”
construct and make inferences from a bar graph
Materials
Sticky notes
Buttons
Crayons
Instructional Plan
Ask the students to count the number of buttons they are wearing, and write that number on a small sticky note. Then draw on the board the outline of a bar graph, with the vertical axis labeled in numbers up to twelve, and the horizontal axis labeled “Number of Buttons.” Label the graph “Number of Buttons We Wore Today.” Call on students to place their sticky notes in the column that shows the number of buttons they are wearing. [As they place the notes, be sure the first note in each column lies on the horizontal axis and that the bottom of each succeeding note touches the top of the last note in that column.]
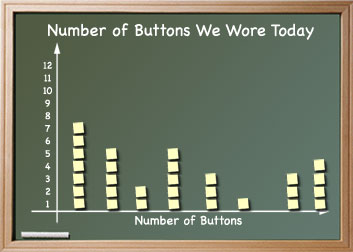
When the students are ready, encourage them to pose questions that can be answered from the graph, such as how many of us had on five buttons? How many more students had on six buttons than had on three buttons today? How many fewer of us had on four buttons than had on two buttons today? Ask the students to make a copy of the graph. [It will be used in Lesson 8.]
Next display two copies of the Shirt Template and put six buttons on one shirt and four buttons on the other shirt. Ask the students how the number of buttons on the shirts could be compared. Repeat with other addend pairs. Then model a subtraction problem in which two sets are compared. For example, if Joan’s shirt has five buttons and Sue’s shirt has three buttons, how many more buttons does Joan’s shirt have? How many fewer buttons are on Sue’s shirt?
Display a large piece of chart paper where all the students can see it. Point out the columns you have labeled “Buttons on the Smiley Face Shirt,” “Buttons on the Starburst Shirt,” and “Difference.” Call on a volunteer to enter the sum, one addend, and the difference on the chart.
Next give each pair of students the template with two shirts, buttons, and a piece of paper for a work mat. Now have the students pose and answer comparison questions.
Begin by helping students model a comparison in which a set of three and a set of four are compared. [If students have difficulty comparing, have them add buttons to the shirt with less buttons until the shirts have the same number of buttons. Then suggest that the students circle the added buttons and count them.]
Next, encourage the students to make up other comparison situations using any numbers they wish. Call on students to share their problems. Finally, ask what would be recorded if both shirts had seven buttons [7, 7, 0]. Prompt the students to add other such entries.
You may wish to suggest that the students record in pictures and in equation form one of the comparing problems for their portfolios.
Questions for Students
Can you show how to compare the number of buttons on two shirts?
Which difference on our chart shows that one shirt had five buttons and the other had three buttons?
If you compared a shirt with seven buttons and another with seven buttons, what would be the difference?
If you compared a shirt with seven buttons and another with zero buttons, what would be the difference?
If you had a shirt with four buttons, how would you make a shirt with three more buttons? With three less buttons?
Suppose you had a shirt with five buttons. How many buttons would have to be on another shirt so that there is a difference of two? Is there another answer?
[7 and 3 are equally valid answers.]
Assessment Options
1. At this stage of the unit, it is important for students to know how to:
model comparison subtraction using the set model
identify differences and addends
recognize the effect of subtracting all and subtracting zero
construct and make inferences from a bar graph
2. The Questions for Students may assist you in understanding your students’ level of attainment of the concepts in this lesson.
3. As you reach the final lesson in this unit, it may be useful to consider how much individual students have grown, and to use this information to plan strategies for remediation and extension activities. This would also be a good time to ask individual students to talk with you about the entries in their unit portfolios.
Teacher Reflection
Which students are able to compare sets and record the differences?
Which students need additional instruction and practice on the objectives of this lesson?
Can most of the students find the difference when one addend is zero? Can they find it when the addends are the same?
Which children met all the objectives of this lesson? What are appropriate next steps for them?
What parts of the lesson went smoothly? Which parts should I change the next time that I teach this lesson?
NCTM Standards and Expectations
Number & Operations Pre-K-2
Use multiple models to develop initial understandings of place value and the base-ten number system.
Develop a sense of whole numbers and represent and use them in flexible ways, including relating, composing, and decomposing numbers.
Develop understanding of the relative position and magnitude of whole numbers and of ordinal and cardinal numbers and their connections.
Count with understanding and recognize "how many" in sets of objects.
Understand the effects of adding and subtracting whole numbers.
Understand various meanings of addition and subtraction of whole numbers and the relationship between the two operations.
Develop and use strategies for whole-number computations, with a focus on addition and subtraction.
Use a variety of methods and tools to compute, including objects, mental computation, estimation, paper and pencil, and calculators.
Develop fluency with basic number combinations for addition and subtraction.
This lesson prepared by Grace M. Burton.
Lesson 8 - Looking Back and Moving Forward
This final lesson of the unit reviews the work of the previous lessons through a variety of activity stations, one of which involves using an interactive graphing tool. Students model with buttons and record addition and subtraction.
Learning Objectives
Students will:
record the results of adding and of subtracting in both the comparative and the “take away” modes
correctly use the terms “addend,” “sum,” and “difference”
explore the effects of adding and subtracting zero and subtracting all
construct and make inferences from a bar graph
Materials
Buttons
Brightly colored paper
Crayons
Graphing Tool (for Station 3)
Button Bingo Grid Activity Sheet (for Station 5)
Instructional Plan
Set up five activity stations. Divide the class into groups of four students and assign groups to stations. Encourage them to visit each of the stations during class time. [If you need more than five stations, you might choose to have more than one of any of the stations.] Since students will need more direction at Station 3, you may wish to introduce this to the whole class before beginning station exploration time.

Each student should roll one die and make a set with as many buttons as there are dots on the die. Then the group should work together to compare the sets and write all the subtraction sentences that are indicated by the four sets. Ask them to record the comparisons in pictures and in number sentences.

Provide each pair with two dice and twelve buttons. The children work in pairs to roll dice, make a set with that many buttons, and compare the sets. The pair with the most buttons in their set makes a tallying mark. After 10 rounds, the children compare their tallies; the one with the most tallies wins the game.

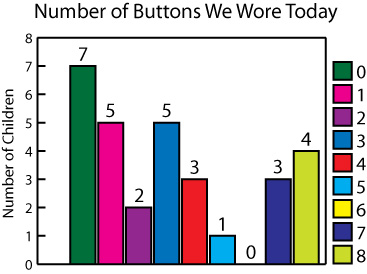
Help the students find the Graphing Tool. When they arrive at the website, ask them to select Bar Chart. Using the class button data from Lesson 7, ask the students to make a bar chart. [You may want to describe the difference between labeling the chart and labeling the vertical axis.] Allow them to choose the colors for each bar. [When the chart is displayed, the number of students who wore each number of buttons appears at the top of each bar.] Ask the students to print their graph after they are satisfied that it displays the data correctly. Then ask them to compare the computer-generated graph with the graph they made with the sticky notes.

Distribute 10 buttons and a brightly colored sheet of paper to each pair of students. Have one student in each pair drop the buttons and count those that land on the paper. The other student will count those that land off the paper. After they compare the numbers, the student whose number is greater records the difference between the buttons that landed on the paper and the buttons that landed off the paper as his or her score for that round. The play continues until one player has 25 points.

Provide buttons and a Button Bingo Grid Activity Sheet to the players. Remind the players how to play the game (see Lesson 3). Then designate one player as caller.
After the children have had time at the stations, call them together and ask them to record in their journals what happened at their station.
Teacher Reflection
Which students met all the objectives of this unit? What extension activities are appropriate for those students?
Which students did not meet the objectives of this unit? What additional instructional experiences do they need?
Given a sum, can all students discover several sets of addends for that sum?
Can students explain the commutative property in their own words?
Can students model finding differences using both the “take way” and the comparison mode?
Can students identify the three (or two) members in a fact family?
Can students explain in their own words the role of zero in addition and in subtraction?
Can students answer comparison questions using a bar graph?
What were the greatest challenges for the students?
Which portions of this unit plan were the students most motivated to complete? Why?
How can I help students to continue to focus on the important ideas in this set of lessons?
What other learning experiences or manipulatives will help students explore addition and subtraction?
How might I connect the ideas of this unit with lessons with similar mathematics content?
What learning experiences would help students not yet comfortable with these concepts?
What did I learn about the students while I taught this unit?
When should I revisit or extend the key ideas of this unit?
NCTM Standards and Expectations
Number & Operations Pre-K-2
Develop understanding of the relative position and magnitude of whole numbers and of ordinal and cardinal numbers and their connections.
Count with understanding and recognize "how many" in sets of objects.
Use multiple models to develop initial understandings of place value and the base-ten number system.
Develop a sense of whole numbers and represent and use them in flexible ways, including relating, composing, and decomposing numbers.
Understand the effects of adding and subtracting whole numbers.
Understand various meanings of addition and subtraction of whole numbers and the relationship between the two operations.
Develop fluency with basic number combinations for addition and subtraction.
Develop and use strategies for whole-number computations, with a focus on addition and subtraction.
Use a variety of methods and tools to compute, including objects, mental computation, estimation, paper and pencil, and calculators.
This lesson prepared by Grace M. Burton.